Deep learning models often need several small adjustments, such as the learning rate, use of other optimization functions, computational layers and preprocessing functions. Because of that, in some situations, it may be desirable to run custom models.
The captcha_fit_model() function is a good way to start,
but it is too rigid. It accepts some parameters to structure the model,
but it does not support customization. Packages like
torch and luz exist to help with this
issue, creating more flexible computing environments to operate deep
learning models.
Another disadvantage of using captcha_fit_model() is the
availability of the fitted models. A model can be used locally, but
sharing the data and the model to other people does not have a
well-defined procedure.
To organize the workflow, there is a workflow template implemented
inside the captcha package. The function that
orchestrates this workflow is new_captcha(). The function
has only one parameter, path=, which is the path of the new
project.
It is also possible to call the function by creating a project within
RStudio. The following image shows an example of the template inside
RStudio, after clicking on
New Project > New Directory.
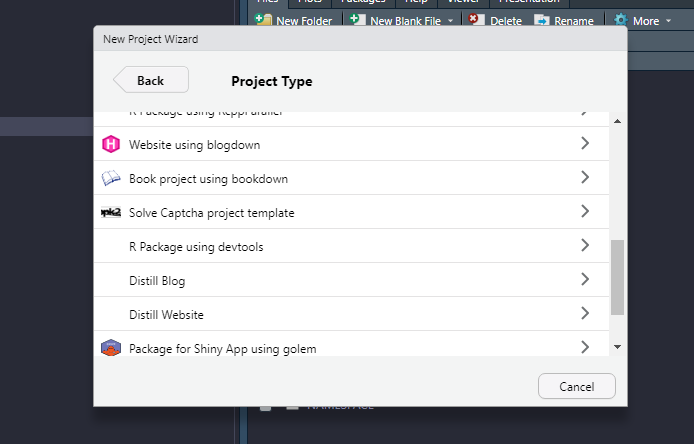
Creating a new Captcha project using RStudio.
After creating a new project, via the new_captcha()
command or via the RStudio interface, a new window opens. The project
contains four files:
-
01_download.R: Contains some code to help writing functions that download Captchas in a real scenario. In practice, the download functions need to be adapted because the websites are organized in very different ways. -
02_annotate.R: Contains a template for manual annotation of Captchas. Manual annotation can either be performed using the interface created by the captcha package or externally. The annotated files are stored in theimgfolder. -
03_model.R: Contains a template for modeling, allowing complete customization of the fitting procedure. The script contains commands to load the data, specify the model, fit the model and save the fitted model. -
04_share.R: Contains operations to create a git repository of the solution and make the fitted model available. The model can be loaded afterwards using thecaptcha_load_model()function, without the need to copy files locally.
03_model.R details
The first step of the script creates objects of type dataset (object that stores the data consistently) and dataloader (object that obtains samples from the dataset, which are used as minibatches inside the model), using a framework orchestrated by the torch package.
The captcha_dataset() function creates the
dataset, taking a folder as a parameter and generates an object
with classes my_captcha, dataset and
R6. The function is actually a
dataset_generator object, created using the
dataset() function from the torch package.
The object is called in the same way as a usual R function, accepting
some additional parameters:
-
transform_image=: transformation function to be applied to the image. By default, it uses thecaptcha_transform_image()function, which reads the image and resizes it to32x192dimensions. The dimension was chosen to facilitate the implementation of convolutional layers and to deal with the fact that usually Captchas are rectangular images. -
transform_label=: transformation function to generate the response variable. By default, it uses thecaptcha_transform_label()function, which receives a vector of all possible Captcha elements and applies theone_hot()operation, obtaining the matrix version of the response with zeros and ones. -
augmentation=: operations for data augmentation. For example, it could be a function that adds random noise to the original image so that when one resample it, the obtained data is always different.
The captcha_dataset() function must be used twice, once
to create the training dataset and once to create the validation
dataset. The separation of training and validation datasets must be done
manually, copying part of the classified Captchas to a new folder, using
randomization.
Next, the dataloaders are created using the
dataloader() function from the torch
package. In this part, the size of the minibatch is defined, in
addition to other possible parameters. For more details, access
the function documentation at this link. The dataloaders
must be created for both training and validation datasets.
The next step involves the model specification. In the modeling
script, the model is provided by the net_captcha
object of the captcha package. As in the case of
dataset, net_captcha is a special object of
torch, with classes CAPTCHA-CNN,
nn_module and nn_module_generator. The object
can be used as a function, generating a torch module,
similar to a prediction function. However, due to the way the object is
used in later steps by the luz package, the object to be
considered is the nn_module_generator, as stated in the
script.
To customize the model, the user must create a new module, modifying
the initialize() and forward() methods, which
can be accessed inside the net_captcha$public_methods
object. The first is responsible for initializing the model, containing
the description of the operations that are performed, such as
convolutions. The second is the feed forward function of neural
networks, which receives an image and returns an object containing the
logits or probabilities, in the format of the response
variable.
By default, the template code is as described below. The parameters
input_dim=, output_ndigits=,
output_vocab_size= and vocab= describe,
respectively, the dimensions of the image, the length of the response,
the length of the alphabet and the elements of the alphabet. The
transform=, dropout= and
dense_units= parameters control, respectively, the image
transformation function, the dropout hyperparameters and the
number of units in the dense layer. Notice that the parameters of the
convolutions are fixed, already prepared to work well with an image of
dimensions 32x192.
initialize = function(input_dim,
                      output_ndigits,
                      output_vocab_size,
                      vocab,
                      transform,
                      dropout = c(.25, .25),
                      dense_units = 400) {

  # in_channels, out_channels, kernel_size, stride = 1, padding = 0
  self$batchnorm0 <- torch::nn_batch_norm2d(3)
  self$conv1 <- torch::nn_conv2d(3, 32, 3)
  self$batchnorm1 <- torch::nn_batch_norm2d(32)
  self$conv2 <- torch::nn_conv2d(32, 64, 3)
  self$batchnorm2 <- torch::nn_batch_norm2d(64)
  self$conv3 <- torch::nn_conv2d(64, 64, 3)
  self$batchnorm3 <- torch::nn_batch_norm2d(64)
  self$dropout1 <- torch::nn_dropout2d(dropout[1])
  self$dropout2 <- torch::nn_dropout2d(dropout[2])

  self$fc1 <- torch::nn_linear(
    # must be the same as last convnet
    in_features = prod(calc_dim_conv(input_dim)) * 64,
    out_features = dense_units
  )
  self$batchnorm_dense <- torch::nn_batch_norm1d(dense_units)
  self$fc2 <- torch::nn_linear(
    in_features = dense_units,
    out_features = output_vocab_size * output_ndigits
  )
  self$output_vocab_size <- output_vocab_size
  self$input_dim <- input_dim
  self$output_ndigits <- output_ndigits
  self$vocab <- vocab
  self$transform <- transform
}
The feed forward function is described below. The function
applies the step-by-step procedure of a convolutional neural network,
with an image x as input and returning a logit matrix
giving the model weights for each letter of the answer. The model
returns the logits, not the probabilities, because the loss function
takes the logits as input. If the user decides to modify the
forward method to return probabilities, she will also need
to adapt the used loss function.
forward = function(x) {

  out <- x |>
    # normalize
    self$batchnorm0() |>
    # layer 1
    self$conv1() |>
    torch::nnf_relu() |>
    torch::nnf_max_pool2d(2) |>
    self$batchnorm1() |>

    # layer 2
    self$conv2() |>
    torch::nnf_relu() |>
    torch::nnf_max_pool2d(2) |>
    self$batchnorm2() |>

    # layer 3
    self$conv3() |>
    torch::nnf_relu() |>
    torch::nnf_max_pool2d(2) |>
    self$batchnorm3() |>

    # dense
    torch::torch_flatten(start_dim = 2) |>
    self$dropout1() |>
    self$fc1() |>
    torch::nnf_relu() |>
    self$batchnorm_dense() |>
    self$dropout2() |>
    self$fc2()

  out$view(c(
    dim(out)[1],
    self$output_ndigits,
    self$output_vocab_size
  ))

}
Once the architecture of the model is defined, the penultimate step
is the fitting step. It is orchestrated by the luz
package, which facilitates the creation of the optimization
loop. The luz package plays a role similar to
what keras does for tensorflow.
In the case of Captchas, the luz code to fit the model
is organized in four steps, linked by the pipe operator, or
|>:
-
setup(): determines the loss function, the optimizer and the metrics to be monitored. The loss function used in the script isnn_multilabel_soft_margin_loss()from torch, the optimizer isoptim_adam()from torch and the metric iscaptcha_accuracy(), developed in the captcha package to show the accuracy considering the complete Captcha image and not the accuracy of each letter of the image, which would be the result if theluz_metric_accuracy()function from the luz package. -
set_hparams(): informs the hyperparameters and other model information. The parameters of this function are the same as theinitialize()method of the neural network created in the previous step. -
set_opt_hparams(): informs the optimization hyperparameters. Parameters placed in this function are passed to the optimization function. In the script, the only used parameter is the learning rate, fixed at0.01. -
fit(): initializes the optimization loop. Here, it is necessary to set the training and validation dataloaders, the number of epochs (by default, 100), and the callbacks, which are operations to be applied at different moments of the fitting (for example, at the end of each iteration). By default, the callbacks are:- The learning rate decay parameter using a multiplicative rate. After
each iteration, the learning rate decays by a factor determined by the
function defined in
lr_lambda, which by default is0.99. That is, in each epoch, the learning rate is 1% lower. - The early stopping. By default, it is set to stop if after 20 epochs the model does not improve accuracy by 1% in the validation dataset.
- The
logfile. By default, the model saves the fitting history in a comma separated values (CSV) file, containing the loss and accuracy of the model in the training and validation datasets, at the end of each epoch. Thelogfile is important to monitor the model fitting and check its performance over the epochs.
- The learning rate decay parameter using a multiplicative rate. After
each iteration, the learning rate decays by a factor determined by the
function defined in
The workflow defined by the luz package returns a
fitted model object. The model has the luz_module_fitted
class and can be inspected by running the object in the R console. A
example is shown below. The object contains a concise and informative
report, showing the total time, metrics obtained in training and
validation, and the architecture of the fitted model.
A `luz_module_fitted`
── Time ────────────────────────────────────────────────
• Total time: 10m 48.1s
• Avg time per training batch: 415ms
• Avg time per validation batch 217ms

── Results ─────────────────────────────────────────────
Metrics observed in the last epoch.

ℹ Training:
loss: 0.0049
captcha acc: 0.996
ℹ Validation:
loss: 0.0356
captcha acc: 0.905

── Model ───────────────────────────────────────────────
An `nn_module` containing 628,486 parameters.

── Modules ─────────────────────────────────────────────
• batchnorm0: <nn_batch_norm2d> #6 parameters
• conv1: <nn_conv2d> #896 parameters
• batchnorm1: <nn_batch_norm2d> #64 parameters
• conv2: <nn_conv2d> #18,496 parameters
• batchnorm2: <nn_batch_norm2d> #128 parameters
• conv3: <nn_conv2d> #36,928 parameters
• batchnorm3: <nn_batch_norm2d> #128 parameters
• dropout1: <nn_dropout> #0 parameters
• dropout2: <nn_dropout> #0 parameters
• fc1: <nn_linear> #563,400 parameters
• batchnorm_dense: <nn_batch_norm1d> #400 parameters
• fc2: <nn_linear> #8,040 parameters
Lastly, the model must be saved to a local file. This is accomplished
using the luz_save() function of the luz
package, saving an object with the .pt extension, which
will be used in 04_share.R.
04_share.R details
The script uses the usethis package to organize the
repository, configuring Git (code versioning software) and GitHub
(web repository organization system). Furthermore, the
script uses the piggyback package to make the
fitted model available in the releases of the new repository.
Optionally, the user can also make the raw data with the annotated files
available in a .zip file, which is recommended, as it
allows other people to work with the same data and improve the
models.
An important detail is about the usage of heavy files in the git repository. The script uses releases to share the solutions because it is not good practice to upload files such as fitted models or raw files (images) directly to the repository. This happens because the repository can become too heavy for the git algorithm to handle.
Once shared across releases in the repository, the model is readable by anyone using the captcha package. Just run the code below and the model will be loaded.
model <- captcha_load_model("<name>", "<user>/<repo>")With this, all the work can be shared and Captchas can be solved in a
collaborative manner by the community. Using the
new_captcha() workflow, the user has the flexibility to
build custom models and the ease to share the results.